Protecting the Perimeter |
|

This section discusses the use of a utilizing a well known opensource application called Wireshark to analyze network traffic. This will discuss how Wireshark is installed and configured in a virtual environment, how it used to capture packets, examples of performing deep packet inspection on a common protocol (TCP), monitoring encrypted traffic and the mapping to the Opensource Interconnection Model (OSI). All of which provide a few of the fundamental elements used to protect the perimeter from outside-in attacks.
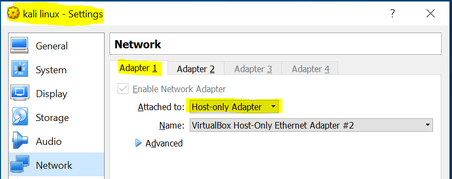
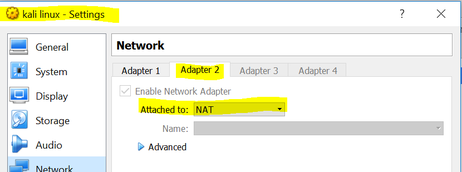
Wireshark is preinstalled with the Kali Linux suite of applications which greatly facilitates the process. However, the network adapters need to be configured correctly in order to capture packets from the internet versus packets communicated across other virtual machines (VM’s). During the initial installation of the Kali Linux VM, I created a network adapter that was intended and restricted to connect to other VM’s on my host machine. I designated “Network Adapter #1” attached to “Host-only Adapter”. See Figure 1.
|
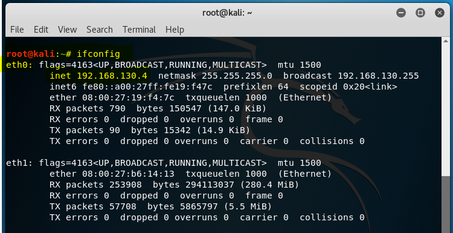
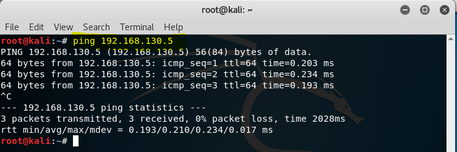
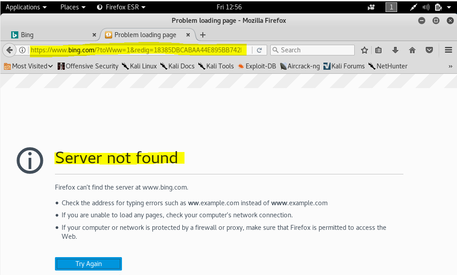
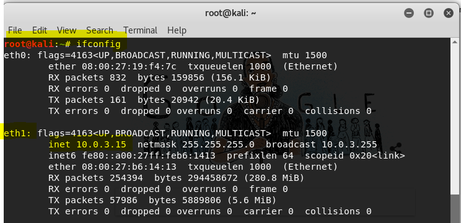
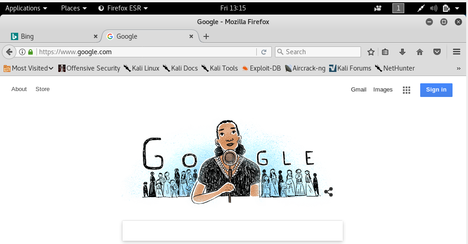
Running an ifconfig at root on the Kali VM shows the following; Network Adapter 1 is connected to eth0 with the following IP address: 192.168.130.4. Figure 2 shows the output. Figure 3 shows the ping request to the CentOS VM node with the IP address of 192.168.130.5. Yet, if I go to www.google.com from my Mozilla browser within the Kali Linux node, it cannot make a connection. See figure 4 for failed google connection.
|
|
Capturing IP Packets
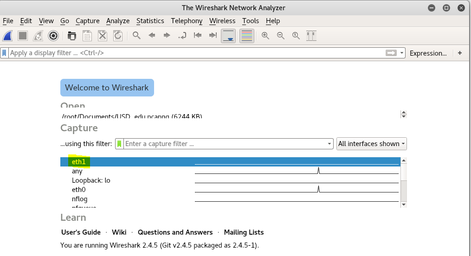
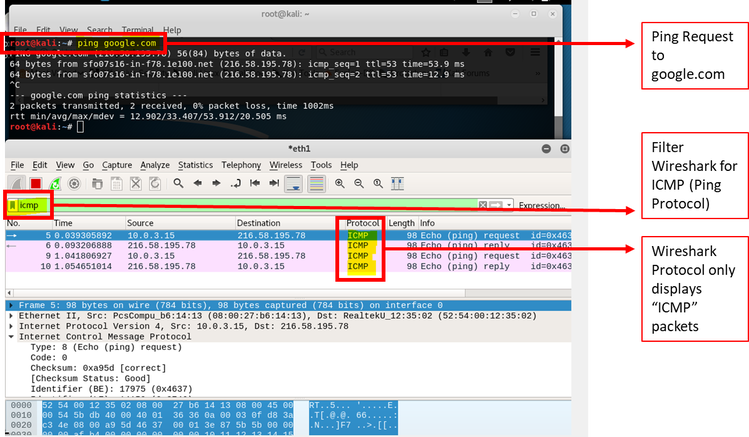
The first step is to start Wireshark, figure 8 below is the opening screen that is displayed to the user. As I have already established, I will select eth1 as my connection to the internet. My intention is to start capturing packets. See Figure 9 below for initial packet capture. On this view, I had two windows open; one was for the Firefox browser, the other is for the Wireshark view. There are a lot of different types of traffic protocols, so I wanted to isolate my packet capture to make the packet capture easier to follow. Therefore, I used a ping request to google.com. Ping operates by sending “Internet Control Message Packet” (ICMP) echo request to a target host and waits for an ICMP reply from that host. Wireshark allows packets to be filtered based on packet type. Therefore, I simply entered “ICMP” in the Wireshark filter window and figure 10 shows the results.
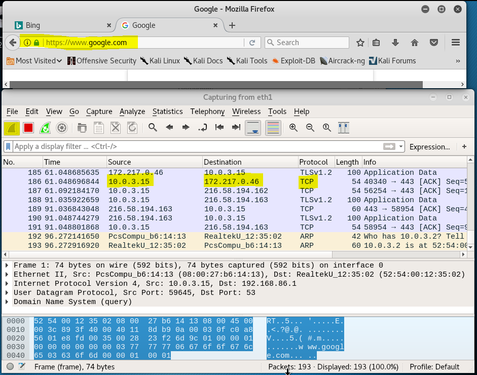
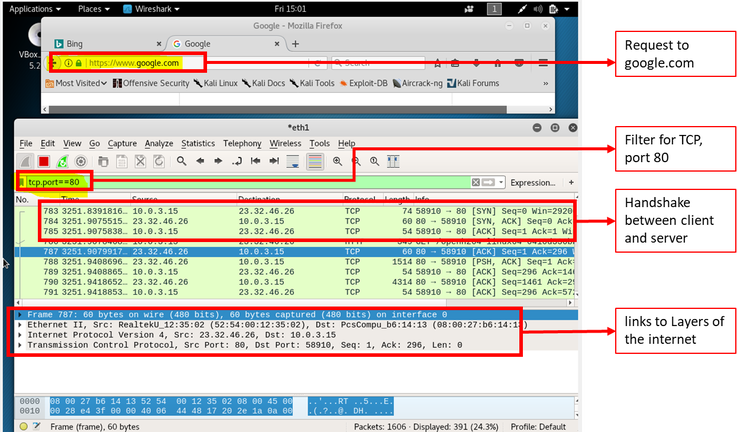
In Figure 10 above, Wireshark presents information in three sections; the top displays the packets that are exchanging between client and server (source and destination), the middle section contains four lines, each line corresponds to one of the layers to the internet and each layer is represented by a header that is contained on the packet. For the following example, I modified the filter in the packet capture from a simple ping request (Protocol ICMP) to a TCP Protocol to “tcp.port==80”. This filter will record only standard web traffic and not other kinds of packets that my computer maybe sending. The checking will translate the addresses of the computers sending and receiving packets into names, which should help me to recognize whether the packets are going to or from my computer. Figure 11 illustrates the results.
Layers of the Internet Expressed in Wireshark (The middle section of the Wireshark capture screen)
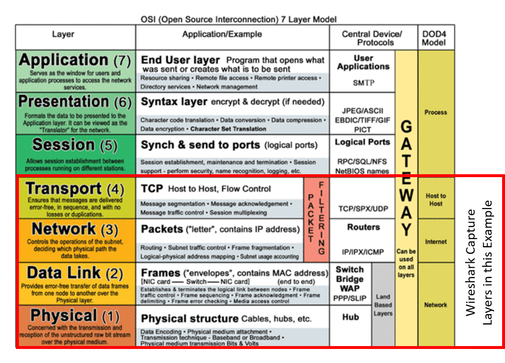
Each of the 4 lines in the middle section of the Wireshark capture screen corresponds to a layer in the internet. The Open Systems Interconnection model (OSI model) is a conceptual model that characterizes and standardizes the communication functions of a telecommunication or computing system without regard to its underlying internal structure and technology. Its goal is the interoperability of diverse communication systems with standard protocols. The model partitions a communication system into abstraction layers. The original version of the model defined seven layers.
|
Layer 1 – The Physical Layer:
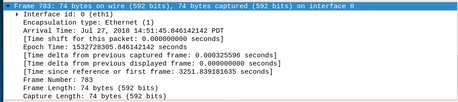
The top line “Frame 787” is header information. This is not a protocol, it is a record that describes the overall information about the packet including when it was captured and the number of bits long it is. In this example it is 74 bytes or 592 bits. |
|
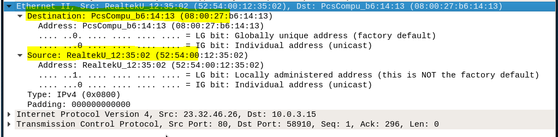
The DataLink layer is relatively simple in that it is only concerned with getting a frame to the next adjacent node on the physical medium. After some research on the internet, I found that “RealtekU” refers to a semiconductor company based in China that manufacturers chips used in network interface controllers often used in Physical Layer applications above). However, I tried looking up the destination “PscCompu_b6” destination and came up with “PCS Computer Systems” with a regular internet search.
Then I did some more digging and I discovered wireshark.org provides tools for decoding information from Wireshark. In this case, it is the Organizational Unique Identifier (OUI), which takes up the first three bytes of an Ethernet address. The IEEE assigns the OUI to manufacturers of Ethernet equipment. that allows anyone to enter the first three bytes of the Hexadecimal code and it returns the manufacturer. I did this for the following destination node: 08:00:27. This returned “PcsCompu PCS Computer Systems GmbH”. I looked this up on the internet and found they are a manufacturer of computers and possibly the manufacturer of motherboard on my laptop (Reeves, 2012).
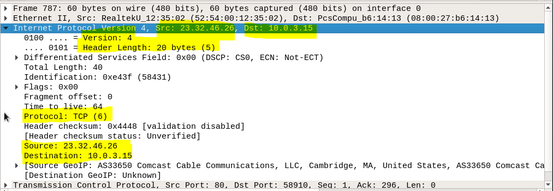
This layer handles addressing and routing the data -- sending it in the right direction to the right destination on outgoing transmissions and receiving incoming transmissions at the packet level. IP is the network layer for the internet. Highlighting the network layer shows more details. From the figure below, I can see the source and destination IP addresses as well as the IP header length (20 bytes in this case) (Salisbury, 2013).
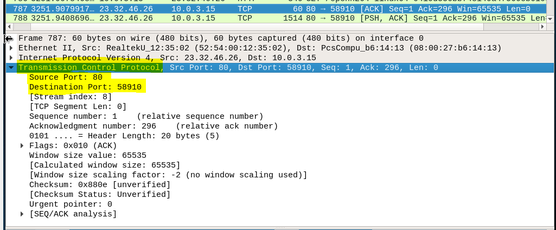
The transport layer is where applications communicate via the use of ports. Looking at the capture shown in the figure below, we can see that the source port is 80 (Server), while the destination port is 58910 (client). I randomly selected Frame 787 as my example which is an acknowledgement [ACK] from the server. In hind-sight, I should have chosen a frame that was a synchronize [SYN] to the server from my client.
In order to capture encrypted traffic, I needed to make sure I was going to a site that has the TLS (formerly SSL) security protocol. I stayed with google.com as this shows as HTTPS:// in the browser menu bar. Next, I opened Wireshark and applied a filter by entering “ssl” in the filter window. Figure 12 shows the screen shot with the results.
Figure 12 – Wireshark with “ssl” Capture Filter
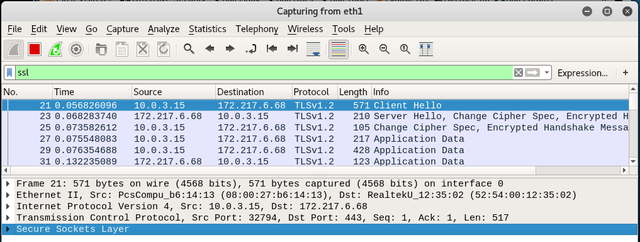
Figure 13 – Wireshark Encrypted Traffic
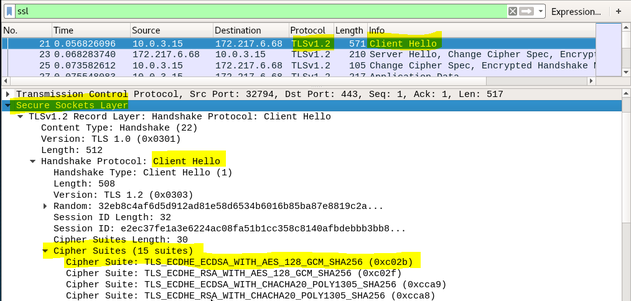
There are two components to this encryption; asymmetric and symmetric cryptography. The asymmetric cryptography portion which is an exchange of public keys between client and server; also known as the “key exchange”. The next is the symmetric cryptography portion. Once the keys are exchanged, the messages will be encrypted using the same key using the symmetric encryption method. The table below is a table the decomposes the cipher suite above and provides a definition of each component.
|
Component |
Meaning |
|
Asymmetric Cryptography
Component |
|
|
TLS |
Protocol
used (Transport Layer Security) |
|
ECDSA |
Elliptic
Curve Digital Signature Algorithm - at a security level of 80 bits (meaning
an attacker requires a maximum of about 2 80 {\displaystyle
2^{80}} operations to find the private key) the size
of an ECDSA public key would be 160 bits, whereas the size of a DSA public
key is at least 1024 bits. |
|
Symmetric Cryptography
Component |
|
|
AES_128_GCM |
·
AES is the symmetric algorithm ·
128 refers to key size in bits ·
GCM is the mode of operation |
|
SHA256 |
This is a
one-way function algorithm that in this context is used to ensure data
integrity. If someone in the middle of the transmission changed data while
being transmitted then how could we know nothing was tampered with? SHA256 is
used as the negotiated hash function to ensure the message has not been
tampered. |
Wireshark is handedly the de-facto standard for Deep Packet Inspection (DPI). A simple Google search on “Wireshark” returns over 11 million results. Moreover, it is aligned with industry standards like the OSI model (Open Source Interconnection Model). As discussed in this paper, the DPI performed on a simple internet search provided details across four layers of the OSI model; the physical layer, datalink layer, internet layer and transport layer. This allows the user to analyze the network traffic in a very organized, structured and well-established approach. Further, Wireshark is reported to support hundreds of protocols, allowing it to be a tool that can scale.
Javvin, J. (2005). Network protocols handbook. Saratoga: Javvin Technologies.
Reeves, S. (2012, September 24). Use Wireshark to inspect packets on your network. Retrieved
July 29, 2018, from https://www.techrepublic.com/blog/linux-and-open-source/use-wireshark-to-inspect-packets-on-your-network/
Salisbury, B. (2013, July 30). What are Ethernet, IP and TCP Headers in Wireshark Captures.
Retrieved July 29, 2018, from http://networkstatic.net/what-are-ethernet-ip-and-tcp-headers-in-wireshark-captures/
StackOverflow. (2014, August 18). Client-server encryption technique explanation
(TLS_ECDHE_RSA_WITH_AES_128_GCM_SHA256, 128-bit keys). Retrieved July 29, 2018, from https://security.stackexchange.com/questions/65622/client-server-encryption-technique-explanation-tls-ecdhe-rsa-with-aes-128-gcm-s
Wireshark.org. (n.d.). Wireshark · OUI Lookup Tool. Retrieved July 29, 2018, from
https://www.wireshark.org/tools/oui-lookup.html